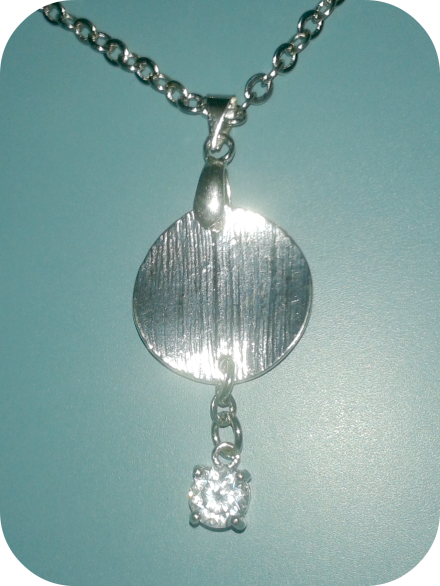
Today I am not going to show you a crafting DIY for boys or for toddlers but rather a super selfish DIY for mommies. 🙂 Lately I have started making my own jewellery and just love how these earrings and necklace turned out. Getting compliments for them at work made me really happy (thanks, Aidin and Julianne!). As my body is a bit A-shaped, I have chosen a rather thick chain to draw attention to the upper part of my body (and away from my hips, haha). 😉 BTW, the style of this chain is called mother-and-son. I love that expression; it reminds me of my cuty. But now let’s start with the tutorial:
The Earrings
You will need for both earrings:
- Two fishhook ball & coil earrings
- Two ear backs/nuts (or fishhook stops alternatively)
- Two silver plates (diameter of ~0.7 inches)
- Two eye pins
- Two gem stone charms
- Two silver (crimp) beads
- Four jump rings
- Two chain links

STEP 1: Using flat pliers carefully open a jump ring by moving the ends aside vertically as shown in the picture below.
STEP 2: String a gemstone charm as well as a chain link onto the jump ring. Close the jump ring. Open a second jump ring and guide it through the chain link.
STEP 3: String the silver plate onto the second jump ring and close it.
This is how the whole assembly should look right now.
STEP 4: Open the eye of the eye pin similarly to how you opened a jump ring and string the silver plate onto it. Close the eye again.
STEP 5: Guide a (crimp) bead onto the pin. I am using the bead here only as a decoration. Shorten the pin and just above the bead form a loop onto which you guide the fishhook earring. Gently close your self-made eye.
Give yourself a slap on the shoulder, because one earring is done. Repeat steps 1-5 for the second earring.
The Necklace
You will need:
- One silver chain
- One silver bail
- One silver plate
- One gem stone charm (with ring)
- Two jump rings
- One chain link
STEP 1: Attach the bail (it is usually open right from the beginning) to the silver plate. Put a layer of tissue paper or fabric around it and gently close it with pliers.
If your bail does not come with such an upper part as shown in the picture, you can simply use one more jump ring (use a bigger one if necessary) for this purpose.
STEP 2: Attach a jump ring, a chain link, and another jump ring to the gem stone charm as described above for the earrings.
STEP 3: String the silver plate onto the jump ring and close it. Next, guide the silver chain through the upper part of the bail, and the pendant is done.
The Closing Mechanism
You will need:
- Your silver chain with completed pendant from above
- Two jump rings
- One springring (the clasp)
STEP 1: Lay both ends of the chain as well as the two jump rings and the springring in front of you as shown in the picture below.
STEP 2: Attach one jump ring to each end link of the chain as explained above. Before closing the right jump ring, string the springring onto it.
That’s it. You are done! Enjoy your new and shiny bling-blings, I mean earrings and necklace! 🙂

I am linking this to Talented Tuesday.
Please click here and leave a comment…. Ich freue mich auch sehr über Kommentare auf Deutsch.


Wow..they are super cute!!
LikeLiked by 1 person
Thank you so much! 🙂 I wish you a wonderful week! 🙂
LikeLiked by 1 person
U too Jana.. 😊
LikeLiked by 1 person
These are lovely! I’ve been looking for a minimalistic style of jewellery recently, and this is perfect! I’ll definitely be trying it 🙂 J x
LikeLiked by 1 person
These are quite lovely. Easy to follow instructions too!
LikeLiked by 2 people
Hi Jessica, this is great news. 🙂 I am glad you like them. I would love to see yours then. Have a lovely week. Jana
LikeLiked by 1 person
Thank you so much, Janice! 🙂
LikeLiked by 1 person
These are really pretty!! Thanks for sharing! 😀
LikeLiked by 1 person
Thank you so much! I am glad you like it! 🙂
LikeLike