
 There was one book that I have read over and over again as a very young girl. It was not particularly well written and the drawings haven’t been very lovely either. I was simply drawn to it by the fact that the hero in this book is a girl called like me: The book’s title is “Jana and the Little Star”. I so LOVED it. 🙂 What it is about? Well, in the middle of the night a little star falls down to the earth onto Jana’s bed. In order to rescue him, Jana needs to return it to the sky before dawn. After several unsuccessful attempts, a friendly astronaut helps the girl and brings the little star back to the sky in his rocket…
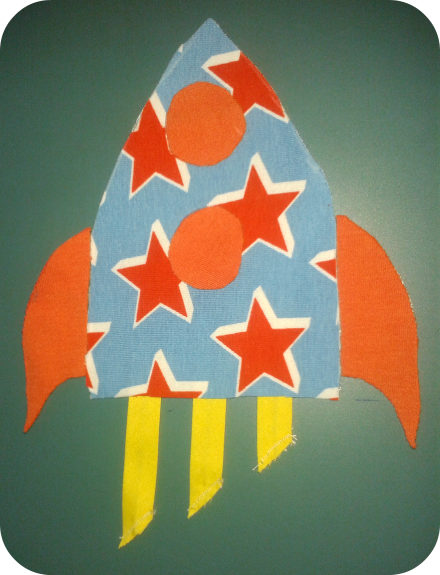
As my son is my biggest fan (and I am his in turn), he too likes the book a lot (see, I still have it). When I had asked him last fall which kind of appliqué he would like to have on one of his new sweatshirts, he said: “A rocket!”. Inspired by the above mentioned book, I designed a rocket and appliquéd it to the front flying towards the sky full of stars (back). I especially love how the star on the shoulder gives away what is hidden on the back of the sweatshirt.
Here is what I did in two parts:
PART 1 – Rocket Appliqué on the front (see below)
PART 2 – Stars Appliqués on the back (see Part 2 here)
List of Materials:
- Plain sweatshirt (this time I bought one)
- Fabric with stars
- Orange fabric (some leftovers are enough)
- Yellow binding tape
- Scissors
- Yellow thread and needle
- This Rocket Appliqué Pattern
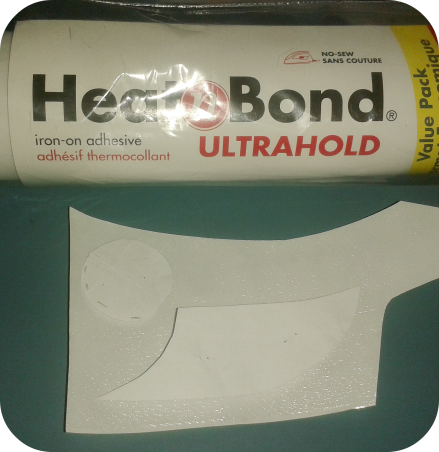
- Heat ‘N Bond or other iron-on adhesive
- Iron
- Sewing machine
Step 1: Print and cut the pattern. Iron the sweatshirt.

Step 2: Transfer the patterns onto iron-on adhesive and cut them. You will need one piece for the body of the rocket and two pieces for both the windows and the rudders.
Note: Iron-on adhesive is used here to prevent the finished appliqué from moving while sewing it on. In addition, it gives an appliqué more strength. It basically has two sticky sides: one is exposed (rough side) and the other is covered by a thin foil. The adhesive is first ironed onto fabric 1 (rough side shows to wrong side of fabric 1). After cooling down the protecting cover foil is removed (fingernails welcome!) and ironed onto fabric 2 (fabric-free side shows to wrong side of fabric 2).
Step 3: Take the rocket body piece you cut from the adhesive and put it onto your fabric with the rough side (the rough material is dry glue) towards the wrong side of the fabric. Iron the pattern according to the instructions given with your adhesive of choice. Do not peel off the foil yet but cut around the pattern.

Step 4: Similarly repeat step 3 with the 2 pieces for both the windows and the rudders. Cut out all shapes from fabric (after the adhesive/foil has been ironed on). Peel off the foil of the window pieces and place them onto the rocket. Iron them on.
Step 5: Cut 3 pieces of yellow binding tape with decreasing lengths. Sew the openings at the bottoms close using a sewing machine and yellow thread.
Step 6: Assemble the rocket and make sure everything turned out as you like it.
Step 7: Peel off the foil of the rocket body and place everything onto your sweatshirt. Iron on.
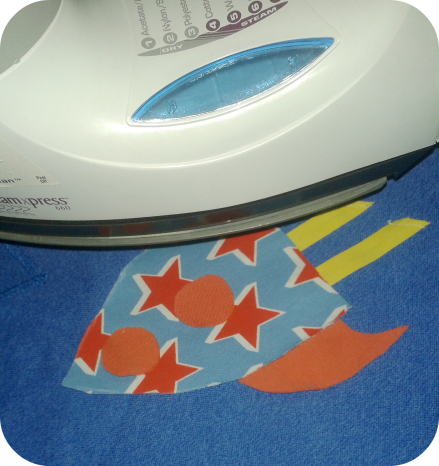
This is how I ironed on the rocket in the beginning. For some reason I preferred the rocket flying the other way round, which is why i detached the appliqué again (just gently peel it off) and ironed it on again (tip to the left this time).

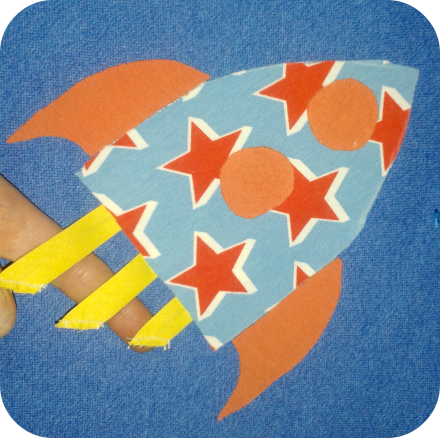
The tail of the rocket is loose and kind of three-dimensional. See how I did not fasten the bottom parts onto the sweatshirt?
Step 8: Grab some yellow thread and your sewing machine in order to sew on the appliqué. 🙂

I used an elastic stitch in the form of a Zigzag stitch. Go carefully around the body…

…continue with both rudders…

…and finish it off with the windows. Do not cut the threads but take a hand needle and sew them towards the back of the sweatshirt. Secure them there by making a few knots. This gives the front a neat appearance and makes the appliqué more robust.

And TADAA! The front part done. 🙂

You can find the second part of this post here.
Please click here and leave a comment… Ich freue mich auch sehr über Kommentare auf Deutsch. 🙂
I am linking this to Kiddikram, Made4Boys, fuersoehneundkerle, and Threading My Way.

That is cool. He will cherish that because you made it.
LikeLiked by 1 person
Very cute and looks super well-made! 😀
LikeLiked by 1 person
Thank you, Jerry! Yes, he likes it a lot. 🙂
LikeLike
Thank you, Hali! 🙂
LikeLike
Keep meaning to my my kids something like this, thanks for the nudge 🙂
LikeLiked by 1 person
🙂 You are welcome! 🙂
LikeLiked by 1 person
That’s really cute – well done 🙂
LikeLiked by 1 person
Thank you so much! I am glad you like it. 🙂
LikeLike
Pingback: Pimp My Sweatshirt: Rock(et) Star — Part 2 | Me & My Veritas
Supercool idea..
LikeLiked by 1 person
Thank you so much!
LikeLike
Great idea to have the design go from the front to the back.
LikeLiked by 1 person
Your comment makes me really happy. This is my favourite part of the whole design. I am so glad you like it, too! 🙂
LikeLike
Pingback: How to Sew Perfect Cuffs: A Tutorial in 27 Pictures | Me & My Veritas
Pingback: Pimp My Sweatshirt: Mr. Fox — Front Appliqué | Me & My Veritas